Fly fishing is an age-old angling method that has been cherished by enthusiasts worldwide for centuries. Characterized by its use of artificial “flies” as bait, fly fishing offers a unique and deeply rewarding experience to those willing to master the skill. Whether you’re standing in the middle of a cool, bubbling stream or casting from the shore of your favorite lake, the allure of fly fishing is undeniable.
But, as with any specialized hobby, fly fishing requires a particular set of gear and equipment to be both effective and enjoyable. For beginners, the array of tools and accessories can be daunting. From the fly rod and reel to the different types of lines and knots, getting started can seem overwhelming.
This guide aims to simplify the process by breaking down the essential steps to assembling your fly fishing gear. By the end of this comprehensive guide, you’ll have the knowledge and confidence to set up your gear correctly, ensuring that you’re ready to hit the water and make the most of your fly fishing adventures.
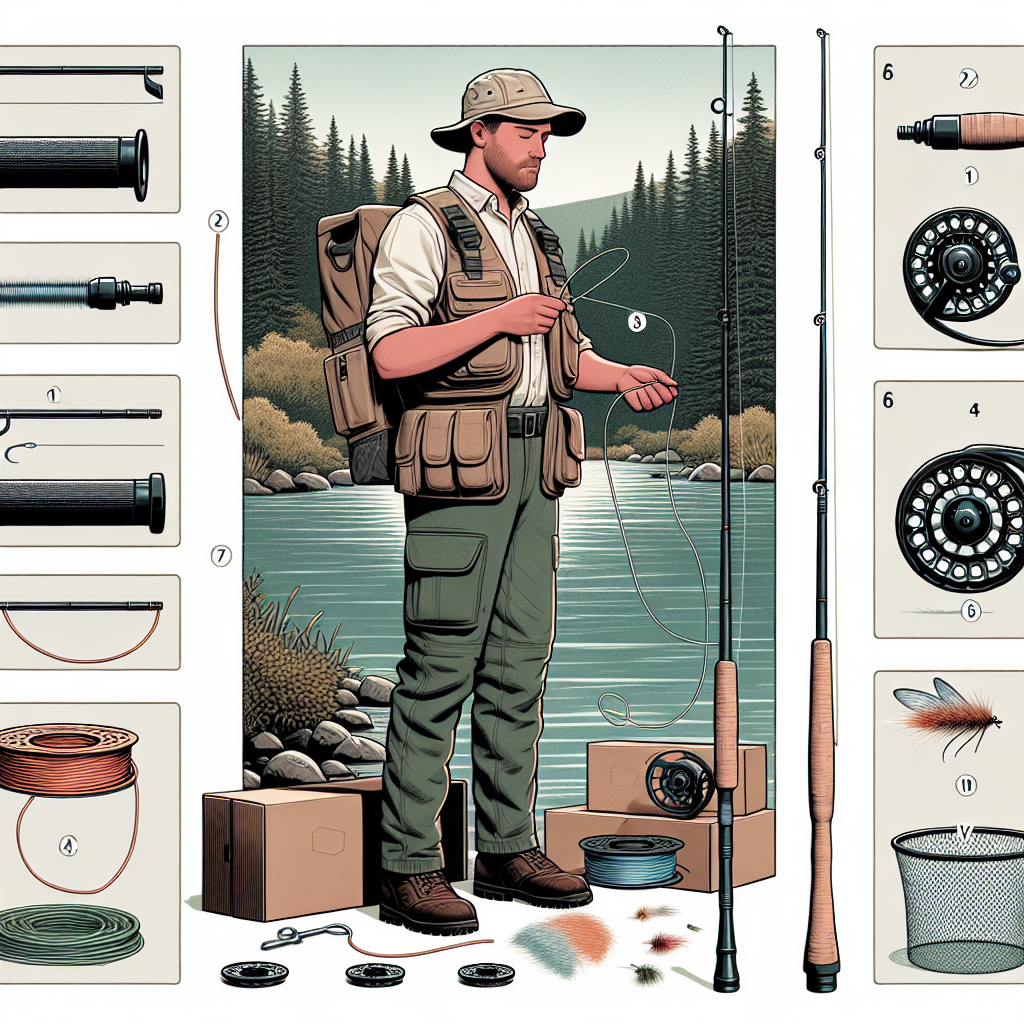
The Fly Rod: Your Primary Tool
The fly rod is arguably the most crucial piece of equipment in your fly fishing setup. It’s the tool that will allow you to cast your fly with precision and control. Fly rods come in various lengths, weights, materials, and designs, each tailored to specific fishing situations. Here’s what you need to know about selecting and setting up your fly rod:
Selecting a Fly Rod: Length and Weight: Beginners typically start with a 9-foot, 5-weight rod, which is versatile enough for most freshwater fishing scenarios.
Material: Most modern fly rods are made from graphite or fiberglass. Graphite is lighter and offers greater sensitivity, making it a popular choice.
Sections: Fly rods often come in two or four sections, making them easier to transport and store.
Assembling Your Fly Rod: 1. Unpack your rod sections and lay them out in order. 2. Align the guides (the small loops on each section) so they form a straight line. 3. Gently insert the end of one section into the ferrule (the receiving end) of the next section. Twist slightly to ensure a snug fit. 4. Attach the rod handle section last, ensuring that all pieces are securely connected.
Fly Reel and Backing: The Heart of Your Setup
The fly reel is much more than just a storage device for your line; it plays a critical role in managing your line and helping you land fish. Here’s how to choose and install your fly reel and backing:
Choosing a Fly Reel:
Size and Weight: Match your reel to the weight of your fly rod. Most manufacturers provide guidelines indicating the appropriate rod and reel combination.
Drag System: There are two main types of drag systems – click and pawl, and disc drag. For beginners, a disc drag system is often recommended due to its smooth, consistent performance.
Attaching the Fly Reel: 1. Place the reel on the reel seat of your rod, ensuring that it is correctly aligned. 2. Secure the reel by tightening the locking mechanism on the reel seat. 3. Attach your backing line to the reel. The backing is a thin, high-capacity line that provides extra line length for fighting large fish. 4. Wind the backing onto the reel evenly, ensuring there are no tangles.

Fly Line: The Key to Casting
Fly line is unique in that it is weighted, allowing it to be cast with the fly rod. Unlike conventional fishing lines, fly lines come in various tapers and densities, each suited for different casting and fishing conditions. Here’s a breakdown of what you need to know about fly lines and how to install them:
Types of Fly Lines:
Weight Forward: This is the most common type and is suitable for beginners due to its ease of casting.
Double Taper: Great for delicate presentations and can be reversed when the forward section wears out.
Sinking Lines: These lines are designed to sink at different rates, useful for fishing below the surface.
Installing the Fly Line: 1. Tie a secure knot (typically an Albright knot) to attach the fly line to the backing. 2. Wind the fly line onto the reel, ensuring it lays evenly without twisting. 3. Tie a loop at the end of the fly line using a perfection loop to allow for easy leader attachment.
Leaders and Tippets: Connecting You to the Fly
Leaders and tippets are essential for presenting your fly naturally and helping to avoid spooking the fish. They are the final connection between your fly line and the fly itself.
Understanding Leaders and Tippets:
Leader: A tapered length of material that transfers the energy of your cast down to the fly. Leaders typically range from 7.5 to 12 feet.
Tippet: The final section of the leader, providing the link to the fly. Tippets can be replaced as they wear out or change with different fly sizes.
Attaching the Leader and Tippet: 1. Use a loop-to-loop connection to attach the leader to the loop you created in the fly line. 2. Select an appropriately sized tippet based on the size of your fly and the target fish species. 3. Use knots like the Surgeon’s Knot or the Blood Knot to join the tippet to the leader. 4. Ensure the knots are secure, trimming any excess material to avoid tangles.
Choosing and Tying Fly Patterns
The final piece in the fly fishing puzzle involves selecting the right fly patterns and knowing how to tie them to your tippet. Flies come in various types, including dry flies, wet flies, nymphs, and streamers, each designed to imitate different stages of aquatic insects or small baitfish.
Selecting Fly Patterns:
Dry Flies: These float on the surface and mimic adult insects. They are perfect for targeting surface-feeding fish.
Wet Flies and Nymphs: Imitate insects below the surface, making them ideal for fish feeding underwater.
Streamers: Resemble small fish, attracting larger predatory fish.
Tying Your Fly: 1. Start by selecting the fly that matches the local hatch or the fish’s diet. 2. Pass the end of your tippet through the hook eye of the fly. 3. Use a knot like the Improved Clinch Knot or the Uni Knot to secure the fly to the tippet. 4. Ensure the knot is snug and trim any excess line.
Conclusion
Assembling your fly fishing gear might seem complicated at first, but with the right guidance and a bit of practice, it becomes second nature. The key is to take the process step-by-step, ensuring that each component is correctly matched and properly secured. From choosing the right fly rod and reel to attaching your fly line, leader, and tippet, each piece of gear plays a vital role in your overall fly fishing experience.
Remember to take the time to learn how each component works together and practice assembling your gear before heading out on the water. This preparation will not only boost your confidence but also enhance your overall fishing experience. Whether you’re a beginner or looking to refine your skills, understanding the basics of assembling your fly fishing gear is fundamental to becoming a successful fly angler.
Happy fishing, and may your lines always be tight and your experiences memorable!