Advanced fly tying techniques separate a serviceable fly from a pattern that tracks correctly, floats at the intended angle, sinks at the intended rate, and survives repeated fish. In practical terms, advanced fly tying means moving beyond simply copying a recipe and learning material control, proportion, thread torque, weight distribution, and finish quality. I have spent enough hours at the vise to know that the biggest jump in results rarely comes from buying exotic materials; it comes from understanding why a sparse dubbing loop breathes better, why thread flattening prevents bulk, and why one extra locking wrap can ruin the profile of a size 20 dry fly.
For anglers, these details matter because fish often respond to behavior more than appearance alone. A nymph that drifts level and sinks quickly can outfish a thicker, overdressed version even when both use the same colors. A streamer with a balanced head and articulated rear section will pulse on the strip instead of spinning. A dry fly with a clean, low-bulk tie-in point and properly divided wing posts lands upright and remains fishable longer. Advanced technique is therefore not about showing off at the tying bench. It is about repeatable performance on the water.
This hub article covers the core advanced fly tying methods that experienced tiers use across dries, nymphs, emergers, wet flies, and streamers. It explains how to select hooks, threads, and weighting systems; how to manage hair, hackle, dubbing, and synthetics; how to create segmentation, translucency, and movement; and how to finish flies for durability. It also connects those skills to pattern design, so you can adapt proven principles to local hatches, water types, and target species rather than relying only on fixed recipes.
If you tie your own flies and want cleaner bodies, stronger construction, more natural movement, and better consistency from fly to fly, advanced fly tying techniques are the foundation. Master these methods and every future pattern becomes easier to understand, troubleshoot, and improve.
Material control starts with hook, thread, and proportion
Every advanced pattern begins with disciplined choices before the first wrap is made. Hook geometry determines silhouette, gap clearance, and leverage during the fight. A standard dry fly hook with fine wire helps buoyancy, while a curved shank hook can improve emerger posture. Heavy jig hooks paired with slotted tungsten beads create inverted nymphs that ride hook point up, reducing snags on rocky bottoms. For streamers, shank length and wire gauge affect both swimming action and durability; long shanks can twist under heavy pressure, so many modern designs use articulated shanks or short shank wide-gap hooks for better holding power.
Thread selection is equally important. Advanced tiers choose thread by diameter, strength, flattening behavior, and finish, not by label alone. UTC Ultra Thread is valued for how easily it flattens, making smooth underbodies and low-bulk heads. Danville Flymaster remains useful for gripping materials with controlled torque. Gel-spun polyethylene threads offer exceptional strength for spinning deer hair or cinching down bulky synthetic wings, but they can cut delicate materials if tension is not managed carefully. On small trout flies, 12/0 or 14/0 thread gives precision, while larger salmon, bass, or pike flies often benefit from stronger deniers that lock materials quickly.
Proportion is where many intermediate tiers stall. The remedy is not guesswork; it is measuring against fixed visual references on the hook. Dry fly tails are often tied to roughly the hook shank length, though mayfly duns can vary by pattern. Wing cases, thoraxes, and hackle lengths should each support function. I still mark visual thirds on the shank mentally before tying segmented nymphs, because correct placement of tails, abdomen taper, thorax bulk, and wing case produces a fly that looks intentional rather than crowded. Once proportions become automatic, speed increases without sacrificing precision.
Thread torque, base layers, and underbody architecture
Advanced tying is largely the art of controlling pressure. Thread torque determines whether materials roll around the hook or stay exactly on top. Clockwise thread spins usually cord and tighten many standard threads; counterclockwise spins often flatten them. That single adjustment changes how cleanly you can attach quills, biots, CDC, and flash. When I teach experienced anglers to solve twisting tails or cocked wings, the fix is usually torque control rather than additional wraps.
A proper thread base creates traction, but too much thread builds bulk and masks the intended profile. On slick hooks, a light foundation helps bind materials securely. On tiny flies, however, an unnecessary full-length thread base can thicken the abdomen before dubbing even begins. Advanced tiers add only what the pattern needs. They also use underbodies intentionally: lead or non-toxic wire for mass, tapered thread wraps for shape, foam or cord cores for volume, and mono rib foundations for segmentation. The underbody is the skeleton of the fly; every later material reflects its shape.
Weight placement deserves special attention because it governs sink rate and attitude. A tungsten bead adds concentrated frontal mass and is efficient for euro-style nymphs. Lead-free wire under the thorax can create a jigging motion. Flat wraps of .015 or .020 wire under an abdomen can maintain a slim profile while increasing sink speed. Resin-coated bodies add durability and a slight density increase but should not be mistaken for deep weighting. When a fly fails on the drift, it is often because the center of gravity was wrong long before the final whip finish.
| Technique | Primary Benefit | Best Use | Common Mistake |
|---|---|---|---|
| Flattened thread wraps | Reduced bulk, smoother bodies | Small dries, midge patterns, clean underbodies | Applying excessive tension and fraying thread |
| Tungsten bead weighting | Fast sink rate with compact profile | Jig nymphs, deep pocket water | Using too large a bead and choking the hook gap |
| Dubbing loop construction | Controlled bulk and enhanced movement | Thoraxes, collars, buggy nymph bodies | Overfilling the loop and creating rope instead of texture |
| Reverse tying materials | Cleaner taper and swept-back profile | Streamers, baitfish heads, soft hackle collars | Failing to lock the tie-in before folding fibers back |
Dubbing loops, composite brushes, and texture management
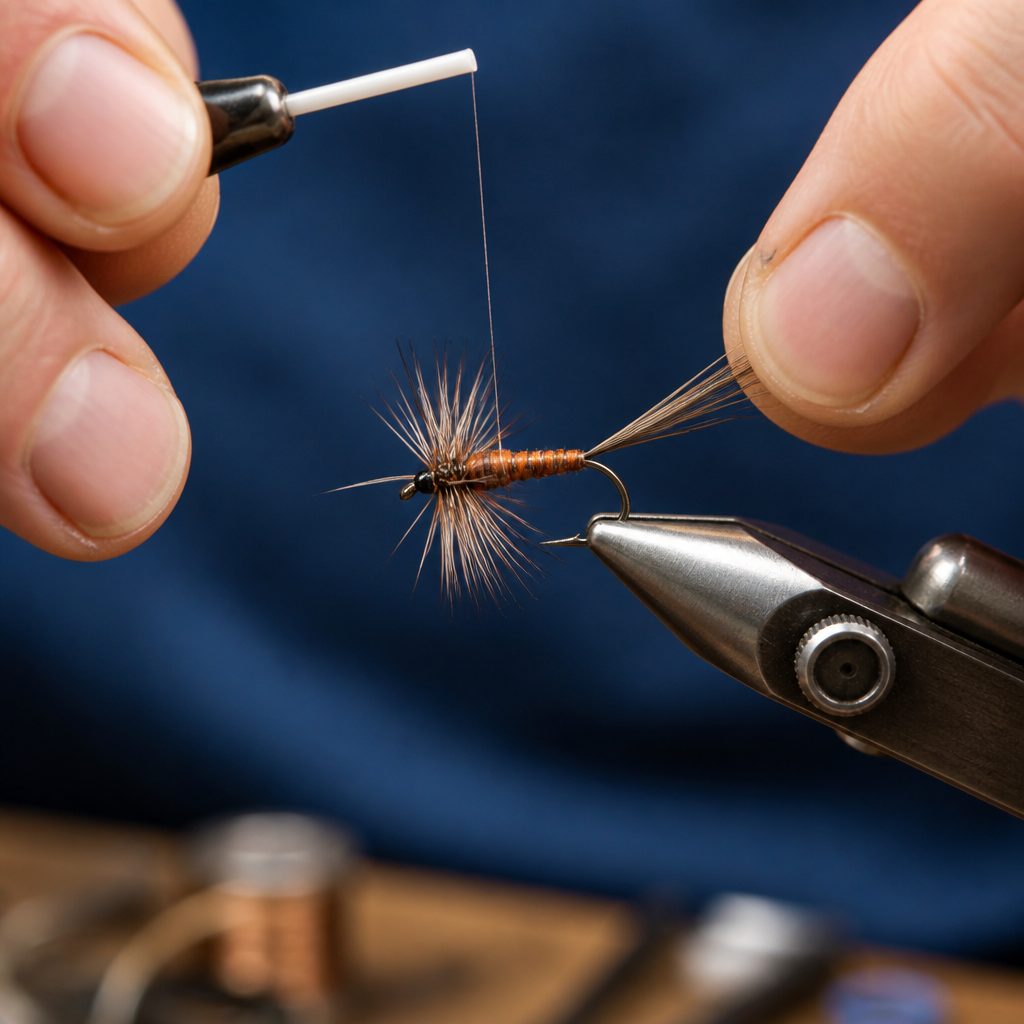
Dubbing loops are one of the clearest markers of advanced fly tying because they solve several problems at once: they add durability, distribute materials evenly, and allow precise control of texture. A sparse loop with natural hare, SLF, or squirrel can create a thorax full of life without the clumping common in hand-twisted dubbing noodles. Insert longer guard hairs on purpose, spin the loop just enough to trap them, then brush and trim selectively. Over-spinning is the usual error; it compresses everything into a dense rope and kills motion.
Composite loops take the technique further. By stacking CDC, flash, dubbing, and soft hackle fibers in a controlled sequence, you can create collars and bodies with translucency and movement that are difficult to achieve any other way. This is especially effective on stillwater chironomids, leech patterns, and modern soft hackles. The same principle drives composite brushes, whether homemade or purchased from brands like Hareline or Semperfli. A good brush saves time in production tying, but building your own lets you tune fiber length, density, and flash level to the exact pattern.
Texture management is not random roughing up. It is the deliberate decision about where a fly should appear smooth, segmented, shaggy, or translucent. Smooth abdomens suggest many mayfly and midge forms. Disrupted thoraxes imitate legs, wing pads, and trapped air. On caddis pupae, a slightly buggy thorax and sparse hotspot can outperform a perfectly neat fly because it catches light and suggests life. Advanced tiers therefore use Velcro brushes, dubbing teasers, and fine scissors not as rescue tools but as part of the design process from the beginning.
Advanced winging, hackling, and hair work
Wing construction separates elegant flies from frustrating ones. CDC requires a different approach than calf body hair or poly yarn. Because CDC traps air and moves with minimal current, it excels in emergers, shuttlecock patterns, and delicate dry fly posts, but it collapses if overdressed or crowded by thread. Deer hair offers buoyancy and flare, making it valuable in comparaduns, caddis, and bass bugs, yet hair quality varies dramatically by body patch, season, and species. Fine coastal deer stacks differently than hollow late-season body hair used for spinning heads.
Hackle technique also becomes more nuanced at the advanced level. Dry fly hackle from Whiting or Metz should be selected by barb length relative to hook gap and intended floatation. One extra turn can make a size 18 fly skate unnaturally, while too little support lets it sink. Parachute hackle demands a stable post and thread wraps that descend neatly without trapping fibers. On soft hackles, fewer turns are usually better. A sparse turn or two of partridge, starling, or hen creates movement; a thick collar often looks dead in the water.
Hair work deserves special respect because it exposes flaws instantly. Spinning and stacking deer hair for bass bugs, mice, and divers requires exact thread pressure and pack sequence. Loose spins create weak heads that twist. Over-tightening too early cuts the hair or causes uncontrolled flare. The best method is staged compression: soft gathering wraps, controlled tightening, then packing with a dedicated hair packer before adding the next clump. After trimming, a dense, symmetrical head pushes water and resists teeth far better than a loose, airy one.
Segmentation, realism, and trigger features
Advanced realism is not the same as photographic imitation. Fish key on shape, proportion, movement, and contrast before they inspect tiny details. Segmentation helps because it breaks up the body and creates the visual cues of insect anatomy. Fine wire, tinsel, monofilament, stripped quill, and biots all achieve segmentation differently. Wire adds durability and flash. Quill creates crisp natural rings but usually needs protection with varnish or UV resin. Biots form lifelike taper and ribbing on many nymphs, though they require careful tie-in orientation to avoid uneven edges.
Translucency is another major trigger. Many natural insects are not opaque blocks of color; they glow, especially underwater. Thin skin, scud back, antron, Zelon, organza, and lightly dubbed synthetic blends can suggest gas bubbles, wing cases, or emerging shucks. UV resin is useful here when applied sparingly. A thin coat over a perdigon body creates a durable, glossy shell that sinks fast and reflects light. A thick coat, by contrast, can make the fly clumsy and mute finer segmentation. Precision matters more than shine.
Trigger points should be intentional rather than decorative. A fluorescent hotspot behind a bead can improve visibility in broken water. A small ice dub collar may imitate trapped air or simply help fish locate the fly. Jungle cock substitutes, barred rubber legs, and lateral flash can all function as triggers in streamers, but too many accents compete with one another. My rule is simple: pick one main trigger per pattern family, then build consistency around it so you can actually evaluate whether it improves catch rates.
Designing durable, fishable streamers and articulated flies
Modern advanced tying often centers on streamers because they combine movement, profile, and structural engineering. Articulation allows a fly to swim with a fluid rear section while preserving a strong hook hold on a short shank trailer. Materials such as schlappen, marabou, ostrich, rabbit strips, craft fur, and synthetic flash all move differently. Marabou breathes with almost no current but fouls if unsupported. Rabbit has unmatched movement yet absorbs water and becomes heavy to cast. Synthetics like EP fibers or Finn Raccoon alternatives shed water better and maintain profile.
Reverse tying is one of the most effective advanced streamer methods. By tying fibers in facing forward and then folding them back, you create clean shoulders, controlled taper, and bulk without stacking excessive material at the tie-in point. This is common in baitfish heads, deceiver variants, and modern trout streamers. Paired with strategic adhesives, such as thin cyanoacrylate on hidden tie-in points and flexible UV resin on heads, reverse tying yields durable flies that remain sparse enough to cast.
Fouling prevention is another hallmark of high-level streamer design. Support loops of mono, short collars of stiffer fiber, or careful platform building can keep mobile materials from wrapping around the hook bend. On articulated flies, connection material matters. Bead-chain loops, wire, and shanks each change freedom of movement and durability. For predatory species like pike, musky, or saltwater fish, hook selection, adhesive use, and corrosion-resistant materials become safety and longevity issues, not just convenience.
Finishing methods, quality control, and pattern refinement
Strong finishes extend fly life dramatically. A whip finish alone is not always enough on flies that strike rocks, teeth, or heavy current. Thin head cement penetrates thread wraps well; thicker varnishes build protective shells on classic wets and salmon flies; UV resins cure quickly and excel on perdigons, wing cases, and baitfish heads. The key is matching the finish to the job. Flexible coatings belong on areas that must bend. Brittle finishes belong only where rigidity helps. A cracked resin shell is not a cosmetic flaw; it is a point of failure.
Quality control should be systematic. I check every advanced pattern for five things before putting it in a box: gap clearance, symmetry, taper, material security, and intended action in water. Gap clearance is often overlooked after adding beads, collars, or bulky heads. Symmetry matters most on wings and streamer profiles. Taper should look continuous rather than stepped. Material security can be tested with a firm pull before cementing. Intended action is best checked in a bowl, sink, or stream edge, because many flies reveal balance issues only when wet.
Refinement happens after fishing, not after admiration at the vise. If a fly lands upside down, reduce top-heavy materials or improve keel weighting. If a caddis skates when it should dead drift, trim hackle or slim the body. If a streamer fouls, shorten the tail, add support, or reduce softness near the bend. Keep notes on versions, hook models, bead sizes, and material substitutions. That discipline turns advanced fly tying techniques from isolated tricks into a reliable system you can apply across every pattern you tie.
Advanced fly tying techniques reward patience because they improve every stage of the process, from material choice to on-water performance. The most important lessons are consistent: control thread torque, build purposeful underbodies, use proportion as a design tool, and choose textures, movement, and trigger points with intent. Whether you are tying a sparse CDC emerger, a tungsten nymph, or an articulated streamer, success depends less on secret ingredients than on how precisely each material is prepared, positioned, and secured.
As a hub for advanced techniques, this guide should help you evaluate any pattern recipe more critically. Ask what the hook shape contributes, why the weight is placed where it is, how the wing is supported, and whether the finish matches the fly’s job. Those questions lead to better substitutions, cleaner tying, and flies that fish harder and last longer. They also make future specialist topics—such as deer hair work, resin bodies, articulated construction, and technical dry fly design—far easier to master.
If you want better flies this season, pick three techniques from this article and practice them deliberately at the vise: flattened thread control, sparse dubbing loops, and disciplined weight placement. Then fish the results, compare them honestly, and refine from there. That is how advanced fly tying becomes durable skill rather than theory.
Frequently Asked Questions
What actually makes a fly tying technique “advanced” rather than just more complicated?
Advanced fly tying is not about adding unnecessary steps or using rare, expensive materials. It is about controlling every part of the fly so it behaves exactly as intended on the water. A truly advanced tier understands how thread pressure affects material flare, how body bulk changes sink rate, how wing placement alters tracking, and how hackle density influences flotation and silhouette. In other words, advanced technique turns tying from assembly into design and execution.
The biggest distinction is intentionality. A beginner may be able to produce a fly that looks close to the recipe, but an advanced tier can adjust proportions, taper, stiffness, density, and weight placement to solve a specific fishing problem. That might mean tying a nymph that drops quickly without looking unnaturally bulky, a dry fly that lands upright every time, or a streamer that swims with a controlled pulse instead of spinning in current.
Advanced technique also includes consistency and durability. It is one thing to tie one attractive fly at the vise; it is another to tie a dozen that all fish the same way and survive repeated strikes. That requires mastery of thread torque, material selection, clean tie-in points, smooth underbodies, disciplined head construction, and reliable finishing methods. In practice, advanced tying is less about complexity for its own sake and more about precision, repeatability, and function.
How important are proportion and material control in advanced fly tying?
They are absolutely central. If there is one area where skilled tiers separate themselves from casual ones, it is in proportion and material control. Most flies fail not because the recipe was wrong, but because the tail was too long, the wing too thick, the thorax too bulky, or the dubbing applied too loosely. Small errors in proportion have major consequences in how a fly casts, lands, sinks, floats, and tracks in current.
Material control means using only as much material as the pattern truly needs and placing it exactly where it belongs. For example, overly dense bucktail can make a streamer stiff and lifeless, while too much deer hair can make a dry fly flare unpredictably or become difficult to trim cleanly. Sparse tying is often one of the most advanced habits to learn because many tiers naturally overuse material, especially when trying to make a fly look full at the vise. On the water, though, excess bulk often hurts performance more than it helps appearance.
Good control also creates cleaner transitions and stronger flies. When materials are measured consistently and secured with appropriate thread pressure, you get smoother tapers, less crowding at the eye, better hook gap clearance, and improved durability. Experienced tiers develop the habit of preparing materials before they ever touch the hook, stacking tips when needed, removing underfur, aligning fibers, and visualizing where the tie-in and tie-off points will be. That level of planning is what gives advanced flies their polished look and reliable fishability.
Why does thread control matter so much in advanced fly tying?
Thread is the steering wheel of fly tying. Once you understand how to control thread position, pressure, and torque, your tying improves across every pattern style. Thread does far more than hold materials in place. It compresses, flares, cinches, distributes pressure, creates taper, and determines how cleanly a fly finishes. Many advanced tying problems are actually thread-control problems in disguise.
One key concept is thread torque, or the natural tendency of thread to twist as you wrap it. That twist changes how materials move around the hook shank. A pinch wrap done with controlled tension can lock a wing on top of the hook, while the same wrap with uncontrolled torque may roll the material to the side. Skilled tiers use this behavior intentionally. They flatten thread when they want smooth coverage and reduced bulk, and they cord it up when they want more grip or cutting power for spinning and securing materials.
Pressure is just as important. Too little tension and materials slip, rotate, or pull free after a fish or two. Too much tension and delicate materials fracture, flare incorrectly, or stack into ugly lumps. Advanced tiers learn to vary pressure through each step: softer wraps to position a material, firmer wraps to lock it, and strategic wraps behind or in front of a tie-in point to guide angle and posture. When thread control becomes second nature, flies get neater, more durable, and far more consistent.
How do advanced tiers control sink rate, flotation, and overall balance in a fly?
They control those qualities by thinking in terms of distribution rather than just total weight or buoyancy. It is not enough to ask whether a fly is heavy or light. The real question is where that weight or flotation sits on the hook and how it affects posture in the water. A fly with all its weight concentrated at the front may dive sharply and ride hook point up, while the same fly with spread-out weight may sink more level and drift more naturally.
For subsurface flies, advanced tiers manage sink rate through bead selection, wire placement, lead or non-toxic wraps, body material density, and profile thickness. Slim, smooth bodies penetrate faster than bulky dubbed ones, even at similar weight. Tungsten beads change sink characteristics dramatically, but so does reducing trapped air by using tighter materials and cleaner finishes. If a nymph is supposed to tumble naturally near bottom, balance and silhouette matter as much as raw mass.
For dry flies, flotation comes from a combination of material choice, proportion, and construction discipline. Overdressing a fly often reduces floatability by trapping water and adding unnecessary weight. Properly sized hackle, well-distributed hair, tapered underbodies, and minimal thread bulk all contribute to a fly sitting at the intended angle. Advanced tiers also understand that some patterns should ride high while others should sit flush or low in the film. The goal is not maximum flotation in every case; it is correct flotation for the insect being imitated and the conditions being fished.
Balance ties everything together. A fly that lands upright, tracks straight, and presents naturally usually reflects thoughtful weight and material distribution. That is why advanced tiers constantly evaluate not just how a fly looks in the hand, but how it will behave the moment it hits moving water.
What are the best ways to make advanced flies more durable without adding unnecessary bulk?
Durability comes from structure and technique more than from simply wrapping more thread or coating everything in cement. In fact, many bulky, overbuilt flies fail early because their materials were not anchored properly from the start. The strongest flies are usually tied with clean foundations, controlled tie-in points, and efficient reinforcement exactly where it matters.
Start with a solid thread base and secure each material with the right number of wraps, not the maximum number. Materials should be prevented from twisting or pulling out by thread placement and tension, not by burying them under excess bulk. Tapered cut ends, trimmed butts, and smooth transitions help create a durable body because each layer supports the next rather than creating weak bumps and gaps. Counter-ribbing over hackle or soft materials, reinforcing vulnerable sections with fine wire or monofilament, and using resin or cement sparingly at stress points can dramatically improve longevity.
Finish quality is another major factor. Crowded heads, rough whip finishes, and sloppy resin application tend to create weak points. A neat, compact head with properly seated thread turns and a small amount of adhesive wicked into the right place is usually stronger than a large, messy finish. Advanced tiers also match materials to purpose. If a pattern will be chewed by aggressive fish or bounced along rocks, fragile decorative fibers may need to be replaced with tougher substitutes that preserve movement without sacrificing lifespan.
Ultimately, durable flies come from disciplined tying habits: fewer but better wraps, cleaner sequencing, stronger foundations, and finishes that protect instead of smother. When technique is sound, a fly can remain slim, balanced, and fishable while still standing up to repeated use.