Fly fishing is an art that combines the beauty of nature with the intricacies of skillful craft. Tying your own fly patterns elevates this experience to a new level, creating a sense of accomplishment and personal connection to your fishing endeavors. Among the myriad of fly patterns, ant flies hold a special place in the heart of fly fishermen. These patterns mimic the natural ants that often fall into the water, becoming irresistible to fish, particularly trout. Tying ant patterns is both an accessible starting point for beginners and an enjoyable project for seasoned tiers.
Ant flies come in various styles, from the simple yet effective black ant to the more elaborate foam ant designs. The materials needed to tie these flies are usually inexpensive and easily obtainable, making this an ideal entry point for those new to fly tying. Basic tools such as a vise, bobbin, scissors, and hackle pliers are required, along with materials like black thread, foam, and hackle.
Despite their simplicity, ant patterns can be incredibly effective. The key to their success lies in their ability to imitate the real thing convincingly. For this reason, focus and attention to detail during the tying process will yield great results on the water. In this article, we will cover essential techniques for tying ant patterns, including selecting the right materials, understanding different ant fly patterns, and step-by-step instructions for creating your own.
Extensive knowledge about the behavior of ants and their seasonal prevalence can also enhance the effectiveness of your ant patterns. Observing real ants and understanding when and where they fall into water bodies can help you tie flies that more accurately mimic real-life situations. With this knowledge, you can anticipate the best times to use your ant flies, ensuring a fruitful and enjoyable fly fishing experience.
This guide is designed to provide you with a comprehensive understanding of tying ant patterns, whether you are looking to start a new hobby or refine your existing fly tying skills.
Materials & Tools Required
Before diving into the techniques of tying ant patterns, it is crucial to gather all the necessary materials and tools. The materials you use can greatly influence the appearance and effectiveness of your fly. Here is a list of basic items you will need:
- Vise: A good vise will hold your hook securely, allowing you to work with both hands free.
- Bobbin: This tool holds your spool of thread, providing tension and control as you wrap the thread around the hook.
- Scissors: Sharp, fine-tipped scissors are essential for cutting thread and trimming materials.
- Hackle Pliers: These allow you to grip and wrap delicate hackle feathers around the hook.
- Hooks: Standard dry fly hooks, sizes 12 to 18, are commonly used for ant patterns.
- Thread: Black thread, typically in sizes 6/0 or 8/0, is a standard choice for tying ant bodies and heads.
- Foam: Black foam, either 2mm or 3mm, can be used to create buoyant ant patterns.
- Hackle: Black dry fly hackle is used for the legs and to add a realistic appearance.
- Dubbing: Black dubbing material can add bulk and realism to the abdomen and thorax of the ant.
Having these materials ready will streamline your fly tying process, allowing you to focus on refining your technique. Additionally, investing in high-quality tools can make a significant difference in the ease and quality of your ties. It’s worth starting with a basic set and gradually expanding as you become more experienced.
Understanding Different Ant Fly Patterns
When it comes to tying ant patterns, there are numerous styles and variations to consider. Understanding these different patterns will help you tailor your flies to the specific conditions you’ll encounter while fishing. Here are a few popular ant fly patterns:
- Simple Black Ant: This is the most basic and commonly used ant pattern. It consists of a black thread body, a segmented appearance, and a few strands of black hackle to imitate legs.
- Foam Ant: This pattern uses black foam to create a buoyant and durable body. It is particularly effective in fast-moving water where a natural drift is essential.
- Parachute Ant: This variation features a “parachute” hackle, providing extra floatation and visibility. It is useful in calm waters where delicate presentations are necessary.
- Cinnamon Ant: This pattern mimics the cinnamon-colored ants that are prevalent in some regions. It involves using brownish-orange dubbing or thread for the body.
- Winged Ant: Adding small wings made of material like white antron or CDC (cul-de-canard) can imitate flying ants, making this pattern effective during the swarming season.
Each of these patterns has its unique advantages and can be highly effective in different conditions. By familiarizing yourself with these variations, you can diversify your fly box and be prepared for a variety of fishing scenarios.
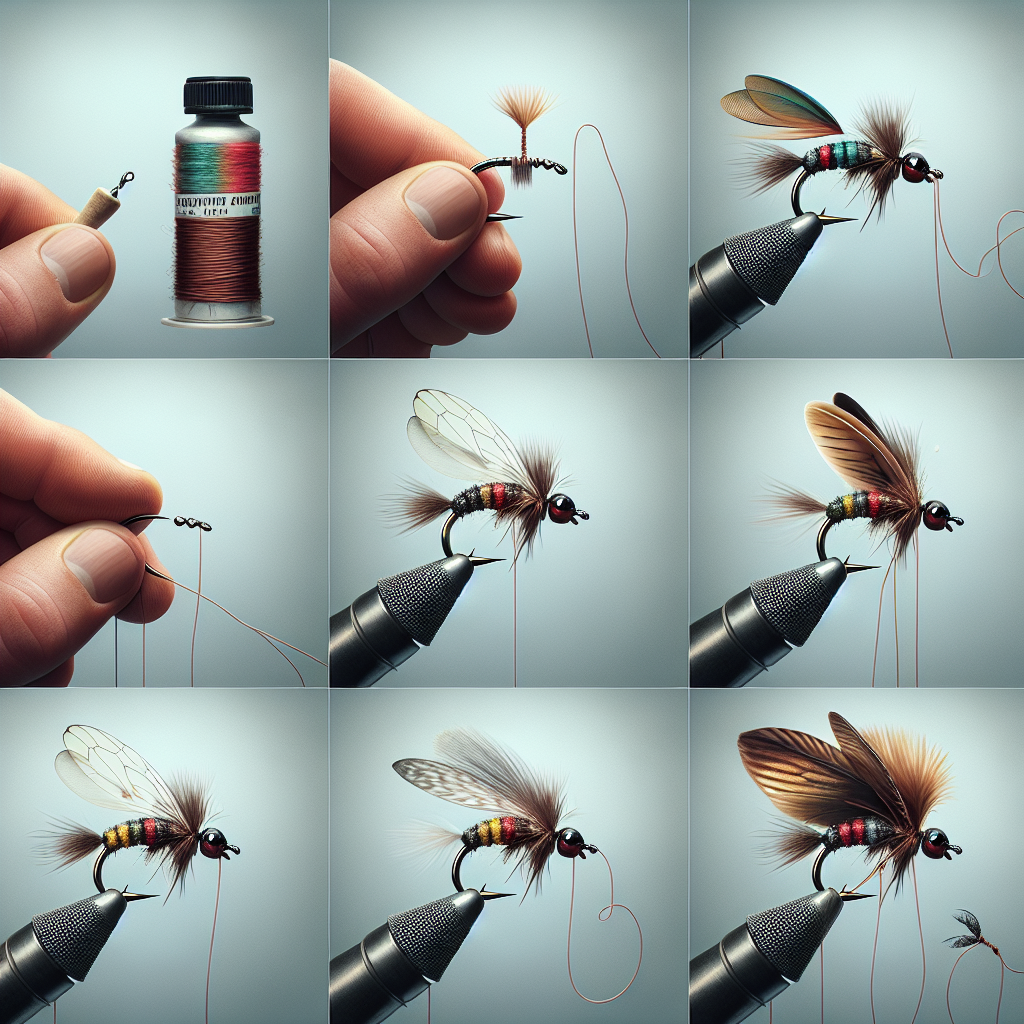
Step-by-Step Guide to Tying a Simple Black Ant Pattern
Tying your own flies can be incredibly rewarding. Here’s a step-by-step guide to creating a Simple Black Ant Pattern, perfect for beginners and effective on the water:
Step 1: Attach the Hook to the Vise
Secure a standard dry fly hook (size 12 to 18) in your vise, ensuring it is firmly held in place.
Step 2: Start the Thread
Attach black thread to the hook shank, starting near the eye and wrapping it back towards the bend, covering the hook shank evenly.
Step 3: Create the Abdomen
Take a small pinch of black dubbing material and twist it around the thread. Wrap the dubbed thread around the rear third of the hook shank to form a small, rounded abdomen.
Step 4: Add Segmentation
Using the black thread, create a small gap after the abdomen, then add another small pinch of black dubbing to form a slightly larger thorax segment. This creates the natural segmentation of an ant’s body.
Step 5: Attach Hackle
Select a black dry fly hackle feather and tie it in at the base of the thorax. Wrap the hackle around the thorax area 2-3 times to create the appearance of legs, and then secure it with a few wraps of thread.
Step 6: Form the Head
Take another pinch of black dubbing and wrap it around the front of the hook shank, just behind the eye, to create a head.
Step 7: Finish the Fly
Whip finish the thread near the hook eye to secure all the materials in place. Trim any excess thread and make sure everything is tight and neat.
Step 8: Apply Head Cement (Optional)
To make your fly more durable, you can apply a small drop of head cement to the whip finish.
Congratulations! You’ve tied a Simple Black Ant, ready to entice fish on your next outing.
Advanced Tying Techniques for Foam Ant Patterns
Once you’ve mastered the basics, you may want to explore more advanced techniques to create foam ant patterns. Foam ants are known for their buoyancy and durability, making them great for various fishing conditions. Here’s how to tie a Foam Ant:
Step 1: Attach the Hook
Secure your hook in the vise as with the simple ant pattern.
Step 2: Start the Thread
Attach black thread to the hook shank and wrap back towards the bend, ensuring the hook is evenly covered.
Step 3: Cut the Foam
Cut a strip of black foam approximately 2-3mm wide. The length should be about double the length of the hook shank.
Step 4: Tie the Foam
Place the foam strip on top of the hook shank, ensuring an even overhang on both ends. Secure the foam with tight thread wraps at the mid-point of the hook shank.
Step 5: Create the Head and Abdomen
Fold one end of the foam towards the hook bend and secure with thread to form the head segment just behind the hook eye. Fold the other end of the foam towards the hook bend and secure with thread to form the abdomen at the rear of the hook.
Step 6: Attach Hackle
Select a black dry fly hackle feather and tie it in at the base of the thorax. Wrap the hackle around the thorax area to create legs and secure with thread.
Step 7: Trim Excess Foam
Trim the foam ends carefully to create a neat and realistic ant shape.
Step 8: Finish the Fly
Whip finish the thread near the hook eye and trim any excess. Optionally, you can apply a small drop of head cement for durability.
A well-tied Foam Ant will float nicely on the water’s surface, making it highly visible and attractive to fish.
Seasonal Strategies for Fishing Ant Patterns
Knowing when and where to fish ant patterns can greatly enhance your success rate. Ants are most prevalent during warm months, especially late spring through early fall. Here’s how to optimize your ant fly fishing techniques seasonally:
Spring
During the spring, ants often start to become active. Look for areas where they may fall into the water, such as banks with overhanging vegetation. Using simple black ant patterns can be particularly effective during this time.
Summer
Summer is the prime time for ant activity. Warm weather and frequent rainstorms cause ants to fall into the water in large numbers. This is the best time to use your foam ants, as they can float well on turbulent waters. Fish near banks, under trees, and in areas with submerged vegetation where ants are likely to drift.
Fall
In early fall, ants are still active, and fish will continue to feed on them. Cinnamon ant patterns can be especially effective, as many regions see a prevalence of these ants during the fall months. Fish in slower currents and pools where ants may accumulate.
Winter
Ant activity significantly diminishes during winter. While it’s not prime time for fishing ant patterns, keeping an eye on warmer days might present brief windows of opportunity.
Conclusion
Tying ant patterns is a rewarding aspect of fly fishing. It combines the satisfaction of crafting something with your own hands and the excitement of knowing that your creations will entice fish. Whether you’re new to fly tying or looking to expand your skills, ant patterns are a versatile and effective tool in any fly fishing arsenal.
By understanding the different materials and techniques, such as tying simple black ants and more advanced foam ants, you can create flies that are both effective and satisfying to use. Furthermore, adapting your strategy based on seasonal ant activity can optimize your chances of success on the water.
As with any craft, practice is key. Your first few attempts may not be perfect, but with time and patience, you’ll find your flies becoming more realistic and effective. Take time to observe natural ants and experiment with different styles and materials to find what works best in your fishing locations.


